Wednesday, June 20, 2012

Uh-Oh!!!?!?!? Sugar Cookies Part 1......


WARNING: LONG POST............OOPS! (but wait is anyway even reading this blog :) )

You know when you find the most perfect recipe, the one that you think will answer all your baking problems, the holy grail of baking? It is such a good feeling when it works out and you think okay maybe I can do these sugar cookie recipes and make them look as pretty as Sweet Sugar Belle or Bee in our Bonnet. So then you go to grab that recipe and you cannot find it!!?!?!? All of your sugar cookie dreams come crashing down! Then after some slightly psychotic searching, which you will never admit to anyone because it will clearly end with you on a psychiatrist's couch or a friend intervention (see How I Met Your Mother's intervention episode for some hilarity), you find it! Even with some questioning (hmmmm am I sure this is it) you try it out and it works woohoo. That is what happened to me with my sugar cookie recipe. I then wrote this blog entry feeling all superior and o wait........lost it again!!!! I only knew the recipe from the picture next to it and even though I didn't find the picture again I think we are back on track now! I am seriously a hot mess!

I have used various sugar cookie recipes and for some reason I have always had a hard time finding one that works well with molds and tastes good. When I made sugar cookies for my coworker's baby shower I thought I had it but while they tasted awesome they did not stay in their shape in the oven. So then I made a new sugar cookie recipe for my friend's shower and it worked out well but then alas it went MIA. I like this recipe and it is easy to work with, even when you cut the recipe in a 1/4 so I am going to stick with it!

After reading some blogs I realized that I could make a lot of cookies and freeze them to decorate for later and this made it a lot easier when I decided to make these adorable ring cookies for a girls nite/bachellerotte get together and then for a jewelry party. One of the blogs that I read (I can't remember which one!!!)mentioned that it easier to roll and cut the dough on the slip pat sheets that go in the oven so you don't have to worry about ruining the design. This cookie cutter does not have the center cut out and while I made a few with the center left in (which is a great idea if you want to put someone's initial) I liked them best looking like a ring; so I used a circle piece of one my cake writing sets but if you had a round cookie cutter that would work well too. Once the center is cut it is harder to move them so I totally suggest just rolling and cutting it on your slip pat or wax paper, really a life saver so thank you to whoever you are!

I learned a lot in decorating these cookies between the first and second time. I used my previous icing recipe, which is delicious if you add the lemon juice and easy if you don't have meringue powder around (maybe not perfect in the setting process but it works)! When I needed to thin it I used lemon juice and a little bit more mix. I discovered that Tip #21 was perfect for doing one big circle on the band, I also piped the top of the ring and then flooded it and threw some fun sprinkles and sparkles on them.

With the left over dough I made some mini cookies, hearts and shoes, that were also a big hit.

While these are not perfect and I have a long way to go I felt like this was a good start! More adventures in sugar cookies to come.........


THE BEST ROLLED SUGAR COOKIES:
(Source: All Recipes)

INGREDIENTS:

1 1/2 cups butter, softened
2 cups white sugar
4 eggs
1 teaspoon vanilla extract
5 cups all-purpose flour
2 teaspoons baking powder
1 teaspoon salt

DIRECTIONS:

- In a large bowl, cream together butter and sugar until smooth. Beat in eggs and vanilla. Stir in the flour, baking powder, and salt. Cover, and chill dough for at least one hour (or overnight).

- Preheat oven to 400 degrees F (200 degrees C). Roll out dough on floured surface 1/4 to 1/2 inch thick. Cut into shapes with any cookie cutter. Place cookies 1 inch apart on ungreased cookie sheets.

- Bake 6 to 8 minutes in preheated oven. Cool completely.


ICING:
(Source: Sheila's Cookies)

INGREDIENTS:
3 cups confectioners' sugar
1/4 cup margarine, softened
1 1/2 teaspoons lemon juice
3 tablespoons milk

DIRECTIONS:

- To make frosting, combine the 3 cups confectioners' sugar, 1/4 cup margarine and 1 1/2 teaspoons lemon juice in a medium bowl. Mix until smooth, adding milk 1 tablespoon at a time until frosting has reached its desired consistency.

Tuesday, June 19, 2012

Beating the Heat!

Okay I have written this post twice (once last year and once again this year) but I have never posted it because BOTH times I forgot to take pictures!!!!! I am not a cook, I just don't like it and I am a vegetarian. However, even knowing this Las year I decided to throw a BBQ Memorial Day weekend on my small patio. I made enough food for a small country, seriously it was ridiculous. I don't think 1/4 of the food was eaten. However, one thing that went like hot cakes was my Homemade Chocolate Chip Cookie Ice Cream Sandwiches. I am not sure if they went so quickly because it was ridiculously hot, I just love that DC is in a swamp, or because my air conditioning decided to break, or maybe it was because they were that delicious. I actually had some left over and they stayed very well in the freezer. I just made my Chocolate Chip Cookies (with minature chocolate chips) and after they cooled put some (melted because it was 1001 degrees inside my apartment) Mint Chocolate Chip Ice Cream and froze them over nite. Even after the BBQ was over I still had a lot left but they were good for the rest of the week and a great treat just to grab out of the freezer!!

O a little tip I learned from this food extravaganza: the deep, disposable lasagna containers are awesome for cooking a ton of marinated veggies on the grill. This way I didn't have to sit there and skewer for hours!

So no picture but just imagine these cookies with an ice cream scoop size of ice cream in the middle!


Tuesday, May 22, 2012

Happy Belated Cinco de Mayo Cookie Style

Happy Belated Cinco De Mayo!!! I actually attended a Quatro de Mayo party and wanted to make something festive so I made my Margarita Cupcakes with Lime Cream Cheese frosting; the party was on Friday nite but I brought them into work via the metro and kept them in our fridge during the day until my friend's husband came to pick them up during the day. My friend who was throwing the party was doing it to celebrate her husband's half Mexican heritage and her love for margaritas. I asked her if her husband felt Chocolate Mexican Wedding Cookies would be sacrarelig and thankuflly she said no because these came out so good and are so easy to make. The directions say to wrap the dough and let it harden for an hour but in true fashion I didn't buy enough pecans so made it in the night before and then came home for work took the dough out to let it soften for awhile and added the pecans mixed it and just went from there. They are sooooooo good and will be definitely be made again.

O if you buy one German Chocolate Bar then you will be fine! I used the blender to grate it but just remember that the blades can melt it so either do sections or just do it quickly (you can also freeze the bar if you want to).

Happy Cinco De Mayo! Now go pour yourself a Margarita!

Yet again I am a bad blogger and forgot to take a picture until I was at work so it was taken while they were in the box with my iPhone.


CHOCOLATE MEXICAN WEDDING COOKIES
(Source: Allrecipes)

INGREDIENTS:

1 cup butter, softened
1/3 cup confectioners' sugar
2 teaspoons vanilla extract
1 3/4 cups all-purpose flour
1 cup ground pecans (I just threw them into the blender)
1/2 cup German sweet chocolate, grated (I just threw it into the blender)
3/4 teaspoon ground cinnamon1 pinch salt
1/2 cup confectioners' sugar
1/4 cup German sweet chocolate, grated


DIRECTIONS:

- In a large bowl, cream the butter and 1/3 cup confectioner's sugar until light and fluffy. Add the vanilla extract.
- In a separate bowl, combine the flour, ground pecans, 1/2 cup ground chocolate, cinnamon and salt; mix well.
- Gradually add the dry ingredients to the creamed mixture.
- Wrap dough in plastic wrap and chill 1 to 2 hours, or until firm.
- Preheat oven to 325 degrees F (180 degrees C).
- Shape the dough into 1-inch balls. Place balls 1 inch apart on an ungreased baking sheet. Bake 15 to 18 minutes, or until the cookies are firm to the touch. Cool 1 minute on the baking sheet, then transfer to a wire rack.
- For the coating, sift 1/2 cup of the confectioner's sugar and 1/4 cup of the ground cocoa into a shallow bowl. While cookies are still warm, roll them in the coating.

Saturday, May 19, 2012

Giganticness Part II

Here is another Gigantic Red Velvet cupcake! This was for my other neighbor, I really do have the best neighbors. The only problem with this one was that I got stuck talking to these awesome neighbors in the hallway and forgot that the cake was in the oven! I could have kicked myself because I was trying to be a perfectionist watching it bake but I still think it came out great.

Also, I could not remember how much frosting I needed for this cake; I usually squirt some into the bottom part and then use it to seal the two halves together. I started making double the frosting recipe and ran out of ingredients so I got up early the next morning to run to the store only to learn that I really needed 1 - 1 1/2 of the cream cheese frosting recipe. For the amount I bake I definitely should know these things! Now I do for the future :)

Friday, May 18, 2012

Devilishly Filled Peanut Butter Cupcakes

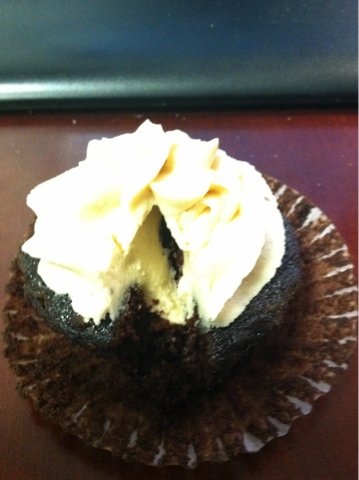
For my co-worker's birthday my devils food cupcakes with peanut butter frosting was a no brainer because that is his favorite but I wanted to do something different this time. After my recent success with filled cupcakes I decided to insert some forsting into the bottom of the cupcake. I know that there are now those fancy cupcake core removers out there but I just took a tube of the frosting a #tip and just stuck it right into the cupcake and filled it until a little came out of the top; I then scraped off all the extra. These came out amazing. My coworkers have had this recipe many times before but the reviews I got on this particular cupcake was astonishing. I actually never eat the cupcakes (I am a batter and frosting girl) but I had to go get one after lunch just to see if they were better and WOW that is some peanut butter heaven.

I originally just made 1 1/2 of the frosting recipe but needed some more for the last few cupcakes so I would say double it (which actually Is what the original recipe called for). These also came out so much cuter than the first time I made them, I am finally trying to get the look to match the taste!


Though previously listed on this site, I figured I would list the recipe again with the correct amount of frosting for filled cupcakes.

PS Sorry for the iPhone cupcakes at my desk, I always forget to take pictures until the last minute!


DEVIL'S FOOD CAKE RECIPE
(Source: allrecipes.com)

INGREDIENTS

1 1/2 cups water
2 cups sugar
3/4 cup butter or margarine
2 eggs, lightly beaten
1 teaspoon vanilla extract
2 cups all-purpose flour
1/2 cup baking cocoa
2 teaspoons baking soda
1/2 teaspoon salt

DIRECTIONS:

Preheat the oven to 350 degrees.

- In a large saucepan, bring water to a boil. Remove from the heat.
- Stir in sugar and butter until butter is melted.
- Add eggs and vanilla; mix well.
- Combine flour, cocoa, baking soda and salt; add to butter mixture and mix thoroughly.

Pour into cupcake pan and bake for 13-15 minutes, it makes 15-20 cupcakes.


PEANUT BUTTER FROSTING
(Modified from: The Peanut Butter & Co. Cookbook)

INGREDIENTS:

1 1/4 C. (2 1/2 Sticks) Unsalted Butter, softened
1/4 C. Smooth Peanut Butter (I use the same amount for half the recipe so you can use a little more)
5 C. Confectioners' Sugar
1/2 tspn. Salt
1/4 C. plus 1 T. Milk


DIRECTIONS:

- In a large mixing bowl, use an electric mixer to whip the butter and peanut butter together.
- Add the confectioners' sugar, salt, and then milk.
- Add additional tablespoons of milk or sugar to loosen or tighten the icing, respectively.
- For best results, use immediately.

NOTES:
- If the Devils Food batter looks thin - don't worry it is!!!
- The icing makes 4 cups, the halved recipes makes enough for one batch of cupcakes but use a whole batch for filled cupcakes.
- I added extra peanut butter, especially when halved, it is not an overly peanut buttery flavored frosting but it is definitely creamy.

Friday, April 6, 2012

Birthday Giganticness!

Last Saturday was a busy baking day! At the same time that I was making my KU Cake I was also making another giagantic cupcake. This time I made a gigantic red velvet cupcake and injected some cream cheese frosting into the middle of it and used cream cheese as glue to put the top and the bottom together. I split purple cream cheese frosting into 2 batches and added pink to the second batch. I put the purple frosting into the bag first and then added the pinkish frosting so they would swirl together; unfortunately, my apartment was super hot and it was not sitting right on the cupcake (I was going top down) so I took it all off and started again but this time bottom up and then went back and went around the gap from the top to the bottom. I was also usper excited to use my new purple sprinkles.

This cupcake looks so cute and my neighbor loved her birthday cupcake! She actually brought it to a friend's house where they were watching the basketball games and she said that the little 2 year old's eyes grew so big when he saw the cupcake and also asked where the rest of it was going when she left with it (after leaving him some for the next day).

One tip I recommend with using this pan is to fill the bottom and cook it for 10 minutes; I also, haven't used this pan in a really long time so I kept checking it and adding 6 minutes over and over again so just make sure you keep your eyes on this one.

Tuesday, April 3, 2012

Chocolate Surprise!!

I have learned from previous cupcakes that people tend to love cupcakes with a little surprise in them and this cupcake is no different. This cupcake got rave reviews and I was told that even nonchocolate lovers loved them. The directions said to fill it with batter and then put in the filling but some reviewers suggested filling them a 1/3 of the way and then put the filling it and then another 1/3. I did that and used my trusty ice cream scoop and filled them 2/3 (about 1 scoop) and then filling and then another scoop. They do rise a little bit and my sunk in a little bit but once you glaze it nobody can tell the difference. Put this in the winner category.


CHOCOLATE SURPRISE CUPCAKES
(Source: Allrecipes)

Ingredients
3 cups all-purpose flour
2 cups white sugar
1/2 cup unsweetened cocoa powder
1 teaspoon salt
2 teaspoons baking soda
2/3 cup vegetable oil
2 cups water
2 tablespoons vinegar
2 teaspoons vanilla extract

1 (8 ounce) package cream cheese, softened
1 egg
1/2 cup white sugar
1/4 teaspoon salt
1 cup semisweet chocolate chips


1.Preheat oven to 350 degrees F (175 degrees C). Line 24 muffin cups with paper liners.
2.In a large bowl, mix together flour, 2 cups sugar, cocoa, 1 teaspoon salt and baking soda. Stir in oil, water, vinegar and vanilla until blended. Pour mixture into prepared muffin cups, filling each 2/3 full.
3.To make the filling: In a medium bowl, beat together the cream cheese, egg, 1/2 cup sugar and 1/4 teaspoon salt until light and fluffy. Stir in chocolate chips. Drop a heaping teaspoonful of the cream cheese mixture into each cupcake. Bake in the preheated oven for 25 minutes. Allow to cool.


SATINY CHOCOLATE GLAZE
INGREDIENTS:

3/4 C. semisweet chocolate chips
3 T. butter
1 T. light corn syrup
1/4 tspn. vanilla extract


There are two different ways to do the glaze - the official directions are first then my short cut ones are second

OFFICIAL DIRECTIONS:

- In a double boiler over hot, but not boiling water, combine chocolate chips, butter, and corn syrup. Stir until chips are melted and mixture is smooth, then add vanilla.
- Spread warm glaze over top of cake, letting it drizzle down the sides.

MY DIRECTIONS:

- In a microwave safe bowl melt chocolate chips and butter, occasionally stirring.
- After melted add corn syrup and vanilla.
- Spread warm glaze over top of cake, depending on the thickness either drizzle it or just spread it over the top and down the sides.